R1 UNIVERSAL
-
How tight should I screw in the spring screws on the mounting kit?
When screwing in the spring screws continue until you feel a clear stop, and do not go any further. Minimum force should be needed when installing your CRYORIG heatsink.
-
When I try to screw on the Spring Screws, I find it difficult to screw the other side once I'm finished with the first. What am I doing wrong?
When screwing the Spring Screws please screw in 1/3rd’s at a time then alternate between both sides. Totally screwing in one side directly may cause harm to the spring screws and make it difficult to screw the heatsink properly. -
When installing my R1, I am having difficulties to screw on the spring screws onto the mounting bar, any tips?
When placing the R1 onto the CPU, first make sure that the spring screws are in fact inserted into the elevated screw holes on the mounting bar. Next, when sliding down the screw driver place the screw driver into the 2nd fin gap counting from the outside. Slightly tilt the head of the screw driver towards the back of the heatsink if you’re having problems locating the spring screw head. Also, you can always easily remove the center XF140 fan if needed. -
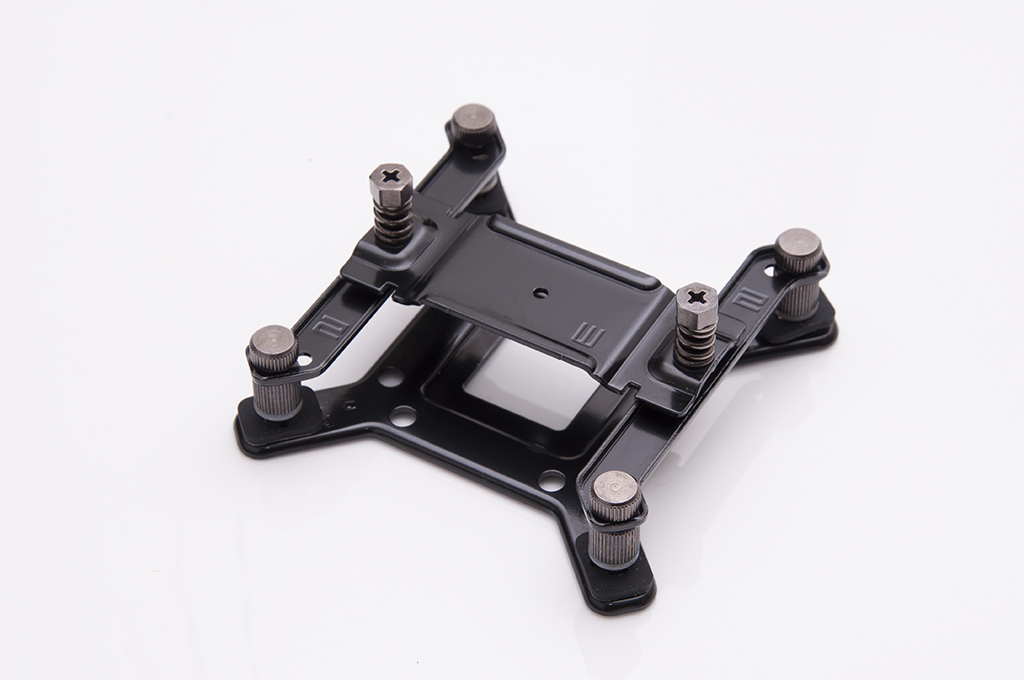
When I install the Backplate onto my mainboard, I notice that the Backplate and Screw Pillars are hanging lose from the mainboard and it is impossible to screw the Screw Pillars all the way down, is this right?
Just like how we mentioned on the Installation Guide, the Screw Pillars are meant to hang and not contact the mainboard. This is actually part of Intel’s and AMD’s design guideline for CPU heatsinks. By leaving space, allows the R1 and the Backplate to sandwich and apply even pressure to the top of the CPU and the back of the socket. This means that the Backplate is correctly doing its job in providing pressure and support for the mainboard, and preventing it from bending. Actually if it were the four Screw Pillars touching and clamping onto the mainboard, then the heatsink would actually be pulling on the mainboard on four individual points rather than a plane. This actually is counterproductive, and not actually putting the backplate to use. -
How do I remove and put back the XT140 and XF140 fans on the R1?
To remove the XT40 and XF140, pull the central handle on the Wireclips backwards then outwards to decouple it from the heatsink frame. When putting back your fan, reverse this process and make sure that the Wireclip is clipped tight on both top and bottom wedges of the heatsink frame. -
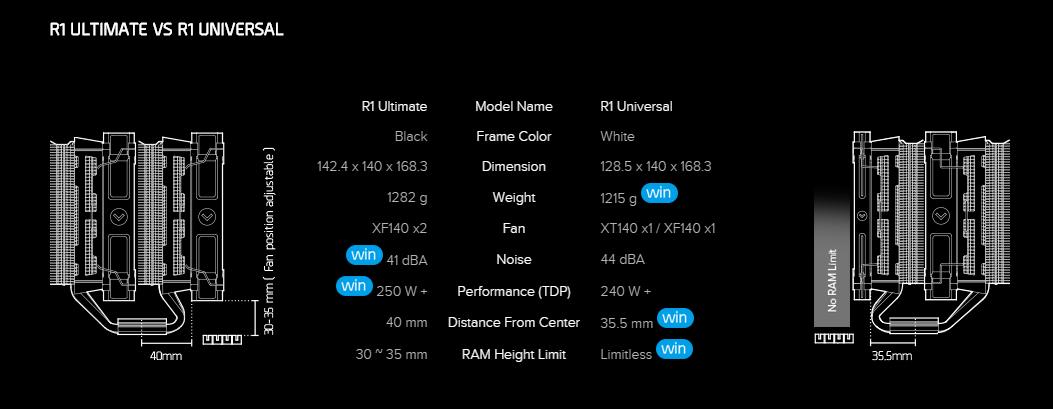
What is the difference between the R1 Ultimate and the R1 Universal?
The R1 Ultimate and Universal were built based on two very different design goals. The R1 Ultimate was designed to demonstrate our innovations towards improving cooling performance and efficiency. With the success of the R1 Ultimate, we later created the R1 Universal to balance the same cooling performance with optimal compatibility. Due to this the heatpipe lateral layout and fin orientation is slightly different between the R1 Ultimate and the R1 Universal. As shown in the comparison below: The fin stacks on the R1 Universal are moved more backwards compared to the R1 Ultimate. This gives the R1 Universal better overall compatibility on Intel LGA 115x/1366 and 775 and AMD platforms even when the R1 Ultimate is using the same XT140 thin fan. On LGA 2011 (X79/X99) it is advised to choose the R1 Ultimate due to it’s back fin stack is not moved as back as the R1 Universal. The back fin stack and the heatpipes of the R1 Universal are much closer to the back RAM slots, which lowers the RAM height tolerance in the back to 32mm. The R1 Ultimate has 30~35mm of height available on the backside.